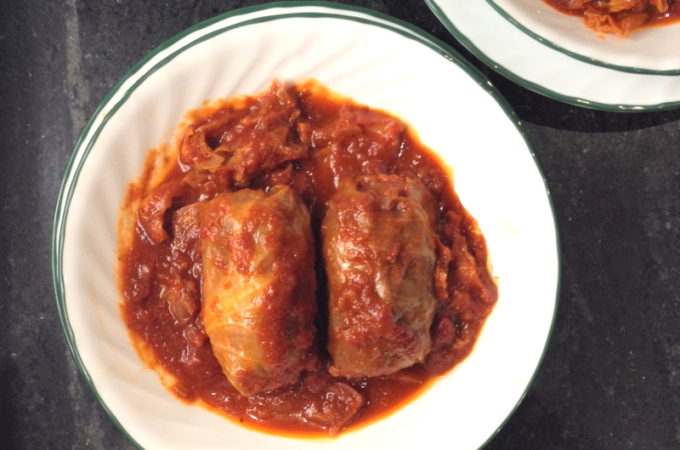
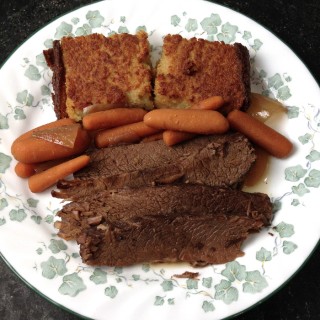
Gnocchi & A Quickie Pasta Sauce

Today’s post is for The Secret Recipe Club, created by Amanda of Amanda’s Cookin’. This is how it works: Every month, you get to scour the blog of another member of the club (assigned to you by Amanda), and pick out and cook or bake any recipe from that person’s blog. And of course, it’s a Secret. Until the big reveal, that is.

My assignment this month, was to choose a recipe from This Chick Cooks. Kate features lots of quick and easy recipes that are great for family meals and desserts, mostly using ingredients that you’re likely to already have in your pantry. The recipe choice was easy: “Mini Italian Dumplings, a/k/a Gnocchi,” adapted from Healthy Cooking magazine. Kate promises that you can have gnocchi on the table in 30 minutes. The secret? This recipe uses instant potato flakes instead of boiling and mashing fresh potatoes.

Now, my husband will tell you that I am a gnocchi freak from way back. In fact, I judge Italian restaurants on the basis of their gnocchi. So, how could I resist a quickie gnocchi? And get your minds out of the gutter, people.

This was definitely quick and easy. I omitted the dried basil called for in the recipe, but changed nothing else, and dressed the gnocchi in my own quickie pasta sauce. Hey, a quickie gnocchi calls for a quickie sauce, right?

Quickie Pasta Sauce

Ingredients:

2 Tbs. olive oil
1 medium onion, roughly chopped
2 – 3 cloves garlic, roughly chopped
2 14 oz. cans chopped tomatoes (I used organic, but I don’t judge)
Kosher salt & freshly ground pepper

Preparation:

Heat the oil on medium-high heat in a 2 – 3 quart saucepan. Add the chopped onion and garlic and sweat until the onion is translucent. Stir in the chopped tomatoes, and season with salt and pepper to your taste.

Partially cover the pot, reduce the heat to medium, and allow to simmer briskly until the liquid is reduced by about half, stirring occasionally. This generally takes about the same amount of time it takes to boil a pot of water and cook your pasta.

This is just the basics. You can saute some chopped bell pepper and/or mushrooms along with the onions and garlic, if you like. You can also add your favorite fresh or dried herbs along with the tomatoes. Whatever you have handy and feel like. Make it your own!

It was really fun, searching through another blogger’s recipe posts for inspiration and a different point of view. Wanna play? Join the Secret Recipe Club here.

Now follow along and see who got who – I can’t wait to see who got me and what they chose to make from my eclectic collection. Will it be a dessert? A main course? A 30-minute family meal? Let’s find out together!


By RJ Flamingo ~ 21 Comments

Freakin’ Flamingo Motto Contest!


Everybody recovered from the 4th of July? Yes? Good! Totally time for a contest!

I’ve been using the catchphrase “Everybody Gets Jam!” for about 7 months now. It started out as a private joke between me and the hubs around Christmastime, when we were trying to figure out what to gift people for the holidays. And even though I’m kinda stuck with it for awhile on a bajillion business cards, t-shirts, market bags, and the like, I think it’s time to freshen things up a bit.

A contest is definitely in order: You get to come up with the next great Freakin’ Flamingo tagline. The winner will receive a Freakin’ Flamingo mug (suitable for coffee, tea, or disguising your fave beverage):

PLUS a heavy-duty market bag: PLUS a jar of any Freakin’ Flamingo product (jam, marmalade, or BBQ sauce) your little heart desires. Check the website to see what’s available.

Your prizes will bear the “Everybody Gets Jam!” line, because, well, I paid for them already. But, your winning motto may appear on my new market banner, on future versions of my business cards, and on all future promotional materials.

The only rules are: Your entry should be original, short, funky, and pithy (kinda like me), and fit on one line. It should be G (or marginally PG) rated. And, most importantly, it should make me laugh. Simple, huh?

Just submit your entry* in the comments on this post, and make sure it’s linked to a good e-mail address, so I can contact you. And, I’m going to open this up to anyone in the U.S. and Canada. Shipping, of course, is on me.

Deadline for entries is Monday, July 11, 2011, so get those creative minds cracking! I can’t wait to see what you come up with!

**UPDATE** The first Freakin’ Flamingo Newsletter will go out on Wednesday, July 13th! That’s the first place the winner will get to see the new tagline in action – sign up for the mailing list now! Please? http://eepurl.com/eEPrk

**UPDATE 2** We have a wiener! Um, a winner! The winning motto is: “Tickle Your Tastebuds Pink!” submitted by Lettergirl. She will receive all of the aforementioned prizes in addition to immortality! At least until I get bored again. Thanks for playing, everyone!

*All entries become the property of Freakin’ Flamingo, LLC and may be used in advertising and promotional materials of every sort, in print and online. By entering this contest, you confirm that your entry is original to you, that you have the right to publish and release said entry, and that you release the contents of your entry to be used by Freakin’ Flamingo, LLC in any manner at its discretion. Compensation for the use of the winning entry is limited to the prizes listed in this post.

By RJ Flamingo ~ 15 Comments

Pie Party: Boswell’s Key Lime Mango Pie

Happy Pie Day! All across the internet and all over the world, bakers of every stripe and every level of proficiency decided to bake pies and illustrate the origins of the expression, “It’s as easy as Pie.” It’s a Pie Party, y’all!

I decided early on to bake a traditional Key Lime Pie for the 4th of July. Key Lime is, after all, the State Pie of Florida. (I will say that my addition of the mango was purely an act of whimsy on my part. Because I have them. And their light sweetness works as a tasty counterpoint to the sweet/tart Key Lime filling.) Who is Boswell, you ask? More about him, later.

So then, what is “traditional”? Let’s have a bit of history:

No one really knows who created the Key Lime Pie. What is not in dispute, however, is that it was created in Key West, Florida and that it’s linked to the appearance of sweetened condensed milk back in the late 1860′s, as Key West was pretty much out of the fresh milk distribution loop and had limited, if any, refrigeration.

As to the ubiquitous graham cracker crust: “Some sources assert [Sylvester] Graham himself invented the snack in 1829; others claim the graham cracker did not come into being until 1882, 31 years after Graham’s death. (The latter date appears to be based on the year recipes for graham crackers started appearing in cookbooks. Many bakers tried to market the crackers, but it wasn’t until 1898 that the National Biscuit Company (now Nabisco) made any real inroads into the market with their Nabisco Graham Crackers product. Nabisco achieved even greater success with their Honey Maid line, introduced in 1925, which boosted the original graham flavor through the addition of honey. (Snopes.com: Last updated: 20 May 2011 Urban Legends Reference Pages © 1995-2011 by Barbara and David P. Mikkelson.)

With supply lines at the time being what they were, and seeing as the first published recipe for the pie didn’t appear until the 1930′s, I don’t believe that the graham cracker made it’s appearance as the crust for Key Lime pie until the late 1920′s, at the earliest. In my opinion, the original crust medium was more likely the soda cracker, an unsalted version of the saltine.

The filled pie can be either unbaked and just refrigerated, as the acid from the Key Lime juice “cooks” the egg yolks (much as the citrus juice in ceviche “cooks” the fish). If you’re a little iffy about such things or have a compromised immune system, you may use pasteurized eggs (such as Davidson’s Safest Choice which are pasteurized in the shell, and an excellent product), or you may bake the pie briefly, as I’ve done here.

Let’s get this straight, once and for all:

1) Real Key Lime Pie filling contains only three things: egg yolks, sweetened condensed milk, and Key Lime juice. Nothing more. You want to fold in whipped cream? Awesome. But that makes it a chiffon pie. Or a mousse pie.

2) Only Key Lime juice is used for Key Lime Pie. Not regular Persian limes. Not bottled regular lime juice. Key Lime juice. Otherwise, it’s a Lime Pie and not Key Lime Pie. There is no substitute.

3) Real Key Lime Pie is topped with meringue, not whipped cream. I don’t care what King Arthur says. They got the date wrong on the invention of sweetened condensed milk, so what else did their source get wrong. (And what the hell is the addition of lime oil all about?!? No, ma’am. That is not a Key Lime Pie.)

4) Key Lime Pie is never, ever, EVER bright green. Period.

Climbing off my soap box (or should that be lime box) now…

Boswell’s Key Lime Mango Pie

Ingredients:

For the Crust:

18 2-cracker sheets soda crackers
2 Tbs. natural cane sugar (may substitute white sugar)
1/3 cup butter, melted

For the Filling:

5 large egg yolks (reserve the whites for the meringue topping)
1 14 oz. can sweetened condensed milk
1/2 cup Key Lime juice (bottled or fresh from apprx. 14 Key Limes)
1 fresh mango (preferably a fiberless variety such as Nam Doc Mai), peeled and sliced
into 11 or 12 thin slices

For the Meringue:

5 large egg whites
1/4 tsp. cream of tartar
6 Tbs. natural cane sugar (may substitute white sugar)
1/2 tsp. clear vanilla extract

Preparation:

Crust: Preheat oven to 350ºF.

In the bowl of a food processor, grind the crackers together with the sugar until very fine. Add the melted butter and pulse until everything is uniformly combined and resembles very wet sand.

Press the cracker mixture into a 9-inch pie plate, using a flat-bottomed drinking glass or measuring cup – or alternatively, with your hands – until the crust is firmly and evenly spread across the bottom and up the sides of the pie plate. Bake for 15 minutes or until it’s a light golden brown. Cool on a wire rack.

Filling: In a medium bowl, beat the egg yolks with an electric mixer at high speed until they are very, very pale and thick. Once you think you’re done, beat them some more. This could take 5 or 6 minutes.

Add the sweetened condensed milk and beat on medium speed until it’s completely incorporated. Add the lime juice and beat until it has been completely incorporated.

Pour the filling into the baked crust. Bake for 10-12 minutes. The filling should be set, but still jiggle a bit when you gently give the pan a shake. Cool on a wire rack, then refrigerate for a minimum of 2 hours or overnight.

When the filling is completely firm, arrange the mango slices on top of it.

Meringue:

Preheat the oven to 375ºF.

Beat the room temperature egg whites together with the cream of tartar on high speed, until very foamy. Slowly add the sugar, then the vanilla extract, while continuing to beat on high, until stiff peaks have formed.

Top the pie with the meringue, using whatever method suits you – pipe, spoon & swirl, mound, whatever. The only important things are: (1) The meringue should be even; and (2) The meringue must completely cover the pie to the edges, making a seal. Otherwise it could shrink away during baking.

Bake for about 15 – 20 minutes, or until the meringue has achieved your desired level of golden brown. If you’ve made lovely peaks, bake only until the tips of your peaks have browned.

Refrigerate the baked pie, and keep it refrigerated until serving time. Otherwise, your slices will look as sloppy as mine, below.


Now, what makes this “Boswell’s Key Lime Mango Pie”? Meet Boswell:

Boswell is a Jack Russell Terrier, belonging to some good friends of ours. He was present (along with the two dogs belonging to our 4th of July party hosts) when we arrived, bearing a large canvas carry-all which contained our food contributions to the party. Including the (thankfully, well-wrapped) Key Lime Mango Pie. If you are unfamiliar with Jack Russell Terriers, let’s just say that they’re one of the more -ahem!- enthusiastic breeds of canines.

The dogs, of course, were the first to greet us at the door. Boswell, being the smallest of the three, leaped on top of the carry-all (to get our attention, presumably), and when yelled at, did what a well-trained dog does: Sat. On my pie.

“It looks so much better this way. Don’t you think?”

Hope you had a Fabulous Fourth of July – Ours was a Blast!

By RJ Flamingo ~ 8 Comments

The Pickle Experiment: Spicy Garlic Cucumber Pickles

Now that I’m back from my travels, I’m going back to the farmers market for inspiration, both for personal use, and for Freakin’ Flamingo.

I love pickles. I can’t think of any meal that a pickle can’t perk up. You know that I’ve made pickles before – pickled asparagus, pickled carrots, pickled spring onions & green garlic, even pickled cantaloupe. What I haven’t pickled yet, are cucumbers. Mostly because I hadn’t seen pickling cucumbers around here that are local and worth the effort.

That’s changed. I recently found a vendor at the South Miami Farmers Market with some of the prettiest – and tastiest – local produce I’ve ever had. Seems I can now get limes and key limes grown locally, not from Mexico or Guatemala. And I can now get pickling cucumbers! In my latest outing this weekend, Laura tossed a few cukes into my box so I could try them out before buying a boatload next weekend.

So, I canned up a quick quart and this is what I came up with:

Spicy Garlic Pickles
(makes 1 quart)

Ingredients:

2 cups white vingegar
1 cup white wine vinegar
1 cup water
1 Tbs. pickling/canning salt

4 pickling cucumbers
1 serrano chili pepper
1 tsp. whole black peppercorns
1 tsp. whole coriander seeds
1 tsp. whole dill seed
1 large clove garlic

Preparation:

Bring the vinegars, water, and salt to a boil in a 2-quart pot.

Slice the cukes in half, lengthwise, or leave whole if you prefer. Heat (or sterilize) a one-quart canning jar and fill the hot jar with the cucumbers (stuff ‘em in there!). Make a long slit in the serrano pepper, give the peeled garlic clove a good whack with the flat of your knife blade, and insert those into the jar, followed by the whole spices.

Fill the jar with the boiling brine, leaving 1/2″ of head space, wipe the mouth of the jar with a clean, very damp paper towel, top with a new, heated lid, and add the screw-on band, tightening finger-tight.

Place the filled jar in a boiling water canner, or even a tall stock pot with a rack in the bottom (make sure you have at least 1″ of water over the top), and boiled, covered, for 15 minutes.

Allow to meld for a minimum of one or two weeks before eating.

Notes:

If you don’t want to boiling water process these, you can put the jar in the fridge after it’s cooled, but it may take a bit longer for the flavors to develop. Also, they have to live in your fridge. One of the benefits of water canning process is that you can leave them in your pantry for months.

I’m going to pop these babies open next weekend, and I can’t wait!

Hey – stay tuned for some special announcements, including some promotions for Freakin’ Flamingo!

By RJ Flamingo ~ 4 Comments

My Worst Food Moment: The Chickens

We interrupt the travelogue that hasn’t yet begun, to accommodate the pêche and his warped concept of a contest worthy of the #IACPPP (that is, the International Association of Culinary Professionals Pity Party… I think). This is for a prize, y’all. We don’t even know what the prize is, and yet, we are willing to humble ourselves and reveal our darkest secrets. For a prize. Yes, we are pathetic. And just when did I adopt this royal “we” thing, anyway? But I digress…

Once upon a time, many, many, many years ago, I lived in a then-modest city in southwest Ohio. It was just large enough that, sure, we had plenty of grocery stores, but just small enough that it was a short drive to the “country” and actual farms.

Very early one morning – oh, around o’dark-thirty – when I was just a wee, impressionable five year old, my dad woke up with the idea of going out to the “country” to an actual farm to buy some chickens.

His grand plan was to go buy the chickens, come back home, pick me up to take me to school, then to go have the chickens killed and dressed at our friendly neighborhood kosher butcher. Of course, he didn’t think to inform me or my mother, for that matter, that he was going to do this. It was a surprise.

Along about the time that I needed to leave for school, Dad pulled up in front of the house and called me out to get in the car. I didn’t realize that there were burlap bags and old wooden crates filled with LIVE chickens in the back seat until it was too late.


We were half-way to school, when the soft clucking turned, first into panicked screeching, then into a full-scale poultry riot. One of the chickens had worked its way loose from a burlap bag, releasing a couple of the others, as well, and flapped wildly to the back of the bench seat in Dad’s old 1956 Buick Special, pulling at my hair, and shrieking at me what I could only interpret as chicken-speak for “I’m not going that easy, kid! You’ll not have ME for supper!” while the others flapped and “flew” around the back seat, hurling themselves at the windows in attempted escape, and echoing her sentiment at the tops of their lungs.


And so, I didn’t. I was so traumatized by the experience, that I refused to eat chicken in any way, shape, or form, in my own home, for a solid year and a half, until I was 100% sure that all of the chickens that I had shared the car with on that Hitchcockian ride to school, were gone.

To this day, I can’t even conceive of eating anyone (anything?) that I’ve known personally – even peripherally. Look at that face. ->Shiver<-

* All chicken photos in this post are used with permission of Beth Compton Ayotte of You Know What You Oughta Do Thanks, Bethie!

By RJ Flamingo ~ 5 Comments

Memorial Day Menu Ideas – From the Archives

Those of you in the U.S. are well into your Memorial Day preparations, but if you’re still stumped, well, you’ve got a problem there, haven’t you? I’m still away from home, but I’m going to celebrate Memorial Day vicariously through you, so get moving! I’ve dug into the archives to bring you a few ideas to give you a bit of a kick start, and I’m going to go in order of what you need to do early, as opposed to the actual meal plan. Ready? Set? Go!

You need some burger buns and maybe some hot dog rolls. This one comes from one of my previous posts on the Healthy Bread in 5 Minutes a Day baking book by Dr. Jeff Hertzberg and Zoe François, posted here. For the first time, I’m going to give you my adaptation (changes noted in red) of the the Soft Whole Wheat Sandwich Bread recipe that I used to make these burger buns a little lighter and healthier. But you have to start right now!

[sloppy_joe02.jpg]
Soft Whole Wheat Sandwich Loaf (and Burger Buns)
(liberally adapted from Healthy Bread in 5 Minutes a Day)

Ingredients:

5 cups whole wheat flour (I substituted half of this with white whole wheat flour)
2-1/2 cups unbleached AP flour
1-1/2 Tbs yeast
1/4 cup vital wheat gluten
(1/4 cup flax seed meal)
1 Tbs. salt
2-1/2 cups lukewarm water (120ºF)
1/2 cup honey (I used agave nectar)
5 large eggs (I used an 8 oz carton of Egg Beaters, which approximates 4 eggs)
2/3 cup melted butter (I substituted canola oil or melted Smart Balance Light Spread)

Mix the dry ingredients together first, then add the liquid ingredients, using the paddle attachment of your mixer, or by hand, and allow to rise for 4 hours on countertop, loosely covered in a very large bowl or container, then refrigerate for several hours before using. (Overnight is best, but you don’t have time for that!) You’re not kneading this dough, so be prepared for it to be very soft and loose – more like a muffin batter than a bread dough.

Preheat the oven to 350ºF.

Sprinkle flour over the top of the chilled dough, and start pulling out roll-sized pieces (you may need or want the assistance of kitchen shears – I also suggest wearing latex or nitrile gloves, as this is going to be sticky!). I like to weigh mine out to about 4 oz. per roll, but you can make them smaller, if you’d like. Form the dough balls into rolls by stretching the edges out and tucking them under, until you get a nice, smooth ball. If you’re making hot dog rolls, give ‘em a bit of a stretch at this point, until they resemble fat logs. Place on a baking pan lined with parchment paper or silicone baking liner, cover loosely with plastic wrap, and allow to rest for about an hour.

Brush the tops of the rolls with water and sprinkle on sesame seeds, if desired. Bake for about 20 mins. or till golden brown.

Let’s move on to dessert. And when I say dessert, I can only mean one thing: Cheesecake! I’ve made several versions of cheesecake for this blog, and there’s something here for everyone – even if you or your guests are watching their weight for health reasons:

Here’s my classic Guilt-Free Cheesecake

[chzck02.jpg]

For ease of serving, nothing beats Mini Coffee Chocolate Chip Cheesecakes or Mini Nutella Cheesecakes, which I adapted from Abby Dodge’s Desserts 4 Today.

http://1.bp.blogspot.com/_mRnGhOqi2Sg/TOW4TFKZS8I/AAAAAAAACOo/NKkqDtArepI/s1600/nutella_cheesecake.jpg
For the grill, try this Coffee & Chipotle Crusted London Broil – you can adapt it to brisket or steaks, too!

http://4.bp.blogspot.com/_mRnGhOqi2Sg/TAOsTp-AmJI/AAAAAAAAB9M/R--zLzPANwI/s1600/coffe_crusted_steak.jpg

For a refreshing side dish, you might like this Endive, Avocado, Tarragon & Grapefruit Salad recipe that I just picked up at CulinAire Cooking School in Washington, DC, while I attended the Eat Write Retreat conference.

http://4.bp.blogspot.com/-zaaav0i1W3s/TdwKufG4UVI/AAAAAAAACZY/me41Lc-6ddo/s1600/endive_grapefruit.jpg
I’m even reprising some of a Memorial Day post I wrote back in 2009. It’s every bit as appropriate today:

Popularly, we’ve all come to think of Memorial Day as the beginning of Summer – when you can bring out your white shoes and sundresses. And there’s nothing wrong with any of that. But I ask you, while you’re standing over your barbecue or puttering in your garden, to Stop. For just a moment. Look around you. Take in the day and your surroundings. Inhale deeply. And Remember.

Remember the men and women in uniform – both military and those we now refer to as “first responders” – who gave their lives in defense of our freedoms. Whatever we feel about war, these brave souls responded to their country’s call and made the ultimate sacrifice in our names. But for them, many of us would not have gardens to putter in or barbecues to stand over, or the food to put on those picnic tables. But for them, some of us wouldn’t even be here today, including me.

We are free and we are safe. Remember. And say Thank You. Even if it’s just a moment to yourself.

Have a beautiful, safe, and delicious day!

By RJ Flamingo ~ 1 Comment

Endive, Avocado, Tarragon & Grapefruit Salad & An Eat Write Retreat Retrospective


The glow of the first Eat Write Retreat weekend still lingers. Sitting in a kind of nasty Hilton Hotel room in Silver Spring, Maryland two days later (to be clear, not the conference hotel, which was the incredibly beautiful and awesome Madison Hotel in downtown Washington, D.C.), surrounded by bags and boxes of insane (in a good way) swag, is a rather stark counterpoint to a brilliant weekend. No, I’m not home yet, nor will I be for another couple of weeks (I have a house-sitter, for anyone out there who might be getting some big ideas – be warned!), so I get to travel around the South with all of these reminders of some very good times.

What you see here doesn’t add up to even half of the goodies we all went home with. Nope. Not even close. And I have twice as much, because Mike decided that he wanted to experience a Food Bloggers Conference. More about that, later. I will say up front, that he received the first shock of an “outworlder”, when we took the swag bags up to the room, and emptied them. “Holy shit! There’s a whole frying pan in here!”, he said upon removing the Calphalon Unison 12″ Griddle Pan, like Arthur pulling the sword from the stone.

And while we did not score one of the coveted Calphalon toasters, panini grills, or 7 quart slow cookers, we did manage to make off with an OXO 14 piece professional knife block set, a couple of their bamboo cutting boards, and one of their new, safer chef’s mandoline slicers (not to mention tongs, measuring cups, vegetable peelers, spice grinders, excellent travel mugs, and on and on). Yes, Calphalon and OXO were very very good to us.

Even Freakin’ Flamingo made a modest appearance in the EWR swag bags, right alongside the big boys like Lindsay Olives, Peanut Butter & Co., Goo Goo Clusters (I just ate one of those while writing this, and oh. my. goodness. oh. We have to get these in Miami. Seriously.), My Spice Sage, and more.

By now, you’re thinking to yourself that Eat Write Retreat was all about the swag. Okay, I’ll admit that the swag is nice. Who’s kidding whom, right? But it was more than that. The organizers (Casey Benedict and Robyn Webb) insisted that the sponsors spend the weekend and attend the conference with the rest of us. We had the unheard of opportunity to spend quality time with the representatives from each of the conference sponsors and panelists, to listen to and learn from each other on a professional level. It was also the opportunity to meet and relate to new friends, and greet Twitter and blog buddies in real life. All of this, not in a hurried couple of minutes while being jostled by a crowd, but in real conversations.

And if all that weren’t enough, there were hands-on learning sessions at CulinAerie, sessions on descriptive writing, food styling and photography, an out of bounds culinary walking – and eating – tour with DC Metro Food Tours, and panel discussions on professional development. We even had the opportunity to sit, one-on-one, with publishers, editors, PR pros, and the sponsors themselves, to pitch ideas and get real, individual, professional advice. Ah-mazing!

I could write for days about everything we learned and everything we did at Eat Write Retreat 2011, but I think you’d get just a little bit jealous. But let me share at least part of our workshop at CulinAerie. We were given valuable instruction in knife skills and other techniques that, frankly, I’ve never seen except on television, and prepared several dishes using that “Queen of Vegetables”, endive, provided by another conference sponsor (and one of our personal faves) California Endive. So, courtesy of Chef/Instructor Susan Holt, here’s the one I prepared with Mike (I’m pretty sure that, since she gave it out to like 80 food bloggers, Chef Susan didn’t mean to keep it a secret):

Salad of Endive, Avocado, Tarragon & Grapefruit
(serves 4)

Ingredients:

8 bulbs of red endive
1 large or 2 small grapefruit (Florida, of course)
1 medium or 2 small avocados, cut in half, pit removed, & scooped from their shell(s)
1/2 cup extra virgin olive oil
4 Tbs. chopped tarragon leaves
Finishing salt (like course sea salt, or one of the many smoked or flavored salts) & pepper

Preparation:

Cut the endive on the bias in 1″ pieces, discarding the core. Supreme the grapefruit by removing rind with a sharp knife and reserving the segments (she means separating the segments from between the membranes); juice remaining membrane into a bowl with the segments and set aside.

Slice each avocado in half into two pieces, lengthwise. Leaving the root end uncut, slice lengthwise into thin slices, and fan each half on a plate. Sprinkle the endive pieces and grapefruit segments over the avocado.

Combine the oil with the remaining grapefruit juice, add tarragon, and spoon over the other ingredients. Garnish with finishing salt and pepper, and serve.

Here are Mike and I, butchering grapefruit. Him, more so than I. I only mangled the avocados.

Look, ma! I made an emulsion! So cool!

Isn’t it pretty? Pretty darned delicious, too! Even at 10:00 a.m.

And what was Mike’s verdict after a weekend with a bunch of food bloggers? Two thumbs-up! “You’re always telling me what an incredible community the world of food bloggers is, and I have to say that I’ve never met so many genuinely nice people in one place, before. This has been an eye-opening experience for me, on so many levels. I really didn’t think I, as an outsider, was going to have such a great time.” I guess this means that I’ll never get to go to another food bloggers weekend without him, now. Casey and Robyn, I think maybe you did too good a job. LOL!

*Many thanks for the additional photographs to Olga Berman of MangoTomato and Allie Mak of Live, Laugh, Eat, who were the “expedition photographers” of the weekend. Thanks, ladies, you were completely awesome!

By RJ Flamingo ~ 15 Comments

Triple Chip Hot Cocoa Cookies

Hi, there! Remember me? Pink? Fluffy?

It’s been a crazy last few weeks, between preparing Freakin’ Flamingo samples for the swag bags at Eat, Write, Retreat (#EWR11), making more jam (because it seems that everything’s in season right now!), and organizing (and baking for) the National Food Bloggers Bake Sale – Miami, benefiting Share Our Strength.

In the middle of all this, I also decided to join up with The Secret Recipe Club, created by Amanda of Amanda’s Cookin’. This is how it works: Every month, you get to scour the blog of another member of the club (assigned to you by Amanda), and pick out and cook or bake any recipe from that person’s blog. And of course, it’s a Secret. Until the big reveal, that is.

My secret mission, this month, was to select a recipe from Kate’s isn’t everything in the kitchen trial & error? (Great blog name, don’t you think?) So I scoured Kate’s blog, literally from the very beginning, searching for a great Bake Sale cookie. You know – chocolate chip, but not so, well, ordinary. Then, just two weeks ago, Kate posted these Hot Chocolate Cookies. Instead of using cocoa, the recipe calls for using full-sugar hot cocoa mix, which gives the cookies a milder, yet rich and chocolatey depth of flavor.

I didn’t change a thing in this recipe, believe it or not. Kate gives you the choice of which type of chips you feel like using that day, so I used all three – milk chocolate, semi-sweet, and white chocolate chips. ‘Cuz that’s just the kind of girl I am. I used a small scoop, about the size of the large end of a melon baller, and got the full 4 dozen cookies – the perfect amount I was looking for.

The texture was – in my mind – perfect. Crisp and chewy at the same time. As Kate observed in her blog post, they freeze really well, too. And look how pretty they look, all dressed up for the big Bake Sale!

It was really fun, searching through another blogger’s recipe posts for inspiration and a different point of view. Wanna play? Join the Secret Recipe Club here.

Now follow along and see who got who – I can’t wait to see who got me and what they chose to make from my eclectic collection. Will it be a dessert? A main course? A 30-minute family meal? Let’s find out, together!


By RJ Flamingo ~ 25 Comments

Coconut Lime Macaroons


Six days down and two to go. The eight-day Passover holiday is nearly over and we’ve run through our cookies and our brownies and our sponge cakes. Time to make macaroons. I grew up thinking of macaroons (as opposed to the French macaron) as Passover cookies. My mother would buy a couple of cans of macaroons (one coconut, one chocolate… and yes, I said cans) every year with her Passover groceries. Even today, when the Passover food displays appear in the grocery store, the predominant sweet lining the shelves is macaroons. And then — they disappear. Poof!


There’s no rational reason for that, of course. Macaroons can be enjoyed all year-round, and flavored to suit your tastes and the season. They’re also entirely gluten-free. My adult tastebuds were asking for something a little different, this year – a little fresher and less cloying. My eyes landed on a pile of fresh limes I’d just bought, and I thought, “Aha! What’s a more natural pairing with coconut, than lime?” And so, the Coconut Lime Macaroon was born:

Coconut Lime Macaroons
(Makes 20-24 large-ish cookies)

Ingredients:

4 large egg whites
pinch of salt
1-1/4 cups sugar
8 oz. (by weight) fine almond meal
7 oz. (by weight) unsweetened dried coconut
Grated zest and juice of 1 large (or 2 smaller) limes

Preparation:

Preheat the oven to 350º F. Prepare 2 cookie sheets by either lining with parchment paper or silicone liners.

In a large glass or metal bowl, beat the egg whites and salt until stiff. While continuing to beat, add the sugar in 4 parts.

Fold in the almond meal, coconut, and lime zest and juice, continuing to fold until everything is completely incorporated. There should be no streaks of whites and you should have a very thick, scoopable batter.

Mound by tablespoonfuls (I used a scoop 2” across) onto the prepared pans, about 1/2″ apart, and bake for 18-20 minutes.

Allow to cool completely on the pans.

Notes:

If you can’t find unsweetened dried coconut (got mine at Whole Foods in the nut/snack aisle), you can use the usual sweetened coconut that you find in the baking section of your grocery store. Just reduce the sugar to between 3/4 cup – 1 cup. I think this makes the macaroons less cloyingly sweet and you don’t have big shreds of coconut to deal with. Your choice.

No almond meal? Just weigh out 8 oz. of blanched almonds and run them through the food processor until they’re finally ground. No need to sift as you might for French macarons.

The lime really enhances the flavor of the almond and coconut, while at the same time cutting the sweetness a bit and adding a fresh note.

These Coconut Lime Macaroons are such a hit around here (my husband said they were the best I’ve ever made), that I’m adding them to the roster of treats I’m making for our National Food Bloggers Bake Sale, benefiting Share Our Strength / No Kid Hungry.

If you’re in the South Florida / Miami area on May 14th, I hope you’ll come out and join me and our roster of fabulous South Florida food bloggers and baking talent, at Fairchild Tropical Botanic Garden – one of my favorite spots on Earth! We’ll have wonderful treats, both sweet and savory, and an incredible Raffle – all to raise money to feed hungry children here in the U.S. Click here to get more information or to donate.

By RJ Flamingo ~ 17 Comments

Passover Supper: Meatball Matzo Ball Stew

Congratulations! You’ve gotten past the Passover Seder meal(s) and lived to tell the tale. The pressure’s off and it’s just you and your nuclear family. But it’s only Day 2 of the 8-day holiday and you’ve still gotta eat. Time to start thinking of some more casual meals, and maybe using up those leftover matzo balls.

If the kids are back in school and you’re back to work, you’ve probably prepared a couple of batches of these Passover Rolls for your lunches. You might remember that I adapted that recipe from a 1960′s Manischewitz recipe folder that they used to give out around the holiday. One of those folders included a recipe for a meatball “stew” which used your leftover matzo balls and included a can of their Tomato Mushroom sauce. Well, if your grocery store is anything like mine, if you can find the product at all, the price has gone right through the roof (yeah, they know they’ve got you!).

I make my version of this Meatball/Matzo Ball Stew every year, but lost the actual recipe quite a long time ago, and stopped using the commercial tomato mushroom sauce even longer ago than that. You know what? You don’t need it. No leftover matzo balls? Well, if you don’t want to make a fresh batch, just cut up a couple of potatoes. It’s all good.

Passover Meatball Matzo Ball Stew
(serves 4-6)

For the Meatballs:

1 lb. lean ground beef
1/2 cup matzo meal
1 egg, slightly beaten
1/2 tsp. salt
1/2 tsp. onion powder
1/2 tsp. garlic powder
2 Tbs. ketchup
1 Tbs. vegetable or peanut oil

Combine everything, except the oil, in a medium bowl until well-mixed.

Heat the oil in a large (about 6 quart) pot over medium-high heat. Form the meat mixture into balls about the size of a golf ball and brown in the oil gently, turning occasionally.

For the Sauce:

1 medium onion, peeled & coarsely chopped
3-4 carrots, scraped & sliced into 1/2″ – 1″ pieces
2 ribs celery, sliced into 1/2″ pieces
1 14.5 oz. can diced tomatoes
Water
1/2 tsp. garlic powder
Salt & Pepper

Matzo balls or 2 – 3 medium potatoes, cut into roughly 1″ pieces

Add the vegetables to the pot with the meatballs, lower heat to medium and stir occasionally, cooking until the onions are soft and translucent.

Add the diced tomatoes, fill the empty can with water and add that to the pot, as well. Season with the garlic powder, salt and pepper to taste, and stir to combine well.

Add the matzo balls or potatoes, and bring to a boil. If your matzo balls are very large, cut them in half or quarters.

Cover the pot tightly and simmer for about 30 minutes. Uncover, stir, and simmer uncovered for about another 10 minutes to reduce the liquid.

This is one of my favorite Passover dishes, and like all stews, it tastes even better the next day!

By RJ Flamingo ~ 5 Comments
  • Shop Freakin’ Flamingo

  • Flamingo’s Favorites Amazon Store

  • Follow the Flamingo

    Follow the Flamingo on Twitter
  • I’m in THIS BOOK!

  • Join the Mailing List

    Freakin' Flamingo Email List - Join Us!
    * indicates required

    View previous newsletters

    The latest products, where I'll be and when I'll be there, recipes, and much more - delivered straight to your mailbox!
  • We LOVE to Help

  • Legal Stuff

    ©2012 Flamingo Musings

    All posts and images are copyright Flamingo Musings, RJ Flamingo and her real life alter-ego (unless otherwise stated) and may not be reproduced in any fashion without permission and attribution. Please click on the "Contact" link for information.

    This blog does accept occasional sponsored posts. Any such posts will be clearly identified.

    This flamingo image and Freakin' Flamingo are registered trademarks of Freakin' Flamingo, LLC, whether or not identified with the ™ symbol. Any use of said trademarked materials, in any form, without express permission of Freakin' Flamingo, LLC is strictly prohibited.